


What Is Authentication?
Authentication is a process or action of proving or showing something to be true, genuine, or valid.
How it works?
One of the most common and obvious ways of authenticating someone's identity is by a password. The database compares the credentials (which generally include an email address or a username and a password) provided by the user. If the entered credentials of the user match with the ones stored in a database, the server grants access to the user. With businesses going passwordless many use modern authentication techniques like one-time passcodes (OTP) via SMS, email, and multi-factor authentication (MFA), to authenticate users and deploy security beyond what passwords usually provide.
What is Authentication used for and its various types?
User authentication ensures that only authorised users can access the resources.
Authentication is of types:
- Single Factor Authentication(or SFA)
- Two-Factor Authentication(or 2FA)
- Multi-Factor Authentication(or MFA)
Most common is SFA, which only requires an email or a username and a password for the logging-in process. 2FA is a subset of MFA; it combines a username and password with a physical or mobile token for extra security. This combination of these factors makes it more difficult for potential intruders to gain access.
How the Browsers works?
Web Browsers communicate with Servers over Hyper Text Transfer Protocol (HTTP). Each time you click something on the webpage, an HTTP request is sent to the server. Servers wait for the HTTP request sent by the browser (or client), process them and return an HTTP response message. This HTTP request and response contains HTTP headers and HTTP body.
So when the browser communicates with the server, it sends HTTP request containing headers and body, headers mainly contains Url of destination, HTTP method (GET, POST, PUT, etc)
Auth Tokens
A Token (or Security Token) which is used to access resources from a restricted source. The user retains access as long as the token remains valid. These tokens provide an extra layer of security to a resource known as MFA (Multi-Factor authentication).
Now let's discuss learn about JSON web tokens
JSON Web Token is a standard way of created data with a signature and maybe even some sort of encryption whose payload carries JSON data. These tokens can be signed using a secret key (with HMAC algorithms), or can be signed with public/private key ( using ECDSA algorithm).
JSON Web Tokens or JWT's are composed of 3 segments.
- Header Segment: It is base64Url encoded JSON object that contains signing algorithm and token type.
This is how it looks:
{
  "alg": "HS256",
  "typ": "JWT"
}
Encode header: eyJhbGciOiJSUzI1NiIsInR5cCI6IkpXVCJ9
- Payload Segment: It is also base64Url encoded JSON object that contain user's information and authentication event timestamp.
{
  "uid": "1234567890",
  "name": "John Doe",
  "iat": 1632529500
}
Encoded Payload: eyJzdWIiOiIxMjM0NTY3ODkwIiwibmFtZSI6IkpvaG4gRG9lIiwiaWF0IjoxNTE2MjM5MDIyfQ
- Signature segment: The final segment is the signature. It is created with the encoded header, encoded payload, and the secret or private/public key
If HMCA SHA 256 algorithm is used, the signature may look like,
HMACSHA256(
base64UrlEncode(header) + "." +
base64UrlEncode(payload),
your-256-bit-secret
)
The resultant token will be: eyJhbGciOiJIUzI1NiIsInR5cCI6IkpXVCJ9.eyJzdWIiOiIxMjM0NTY3ODkwIiwibmFtZSI6IkpvaG4gRG9lIiwiaWF0IjoxNTE2MjM5MDIyfQ.SflKxwRJSMeKKF2QT4fwpMeJf36POk6yJV_adQssw5c
Okay so now we know what tokens are, getting back to the topic
These token are generated by the authentication server when the user tries to login from the browser only if the credentials of the user are valid.
At the moment 2 token are created
- Access Token
- Refresh Token
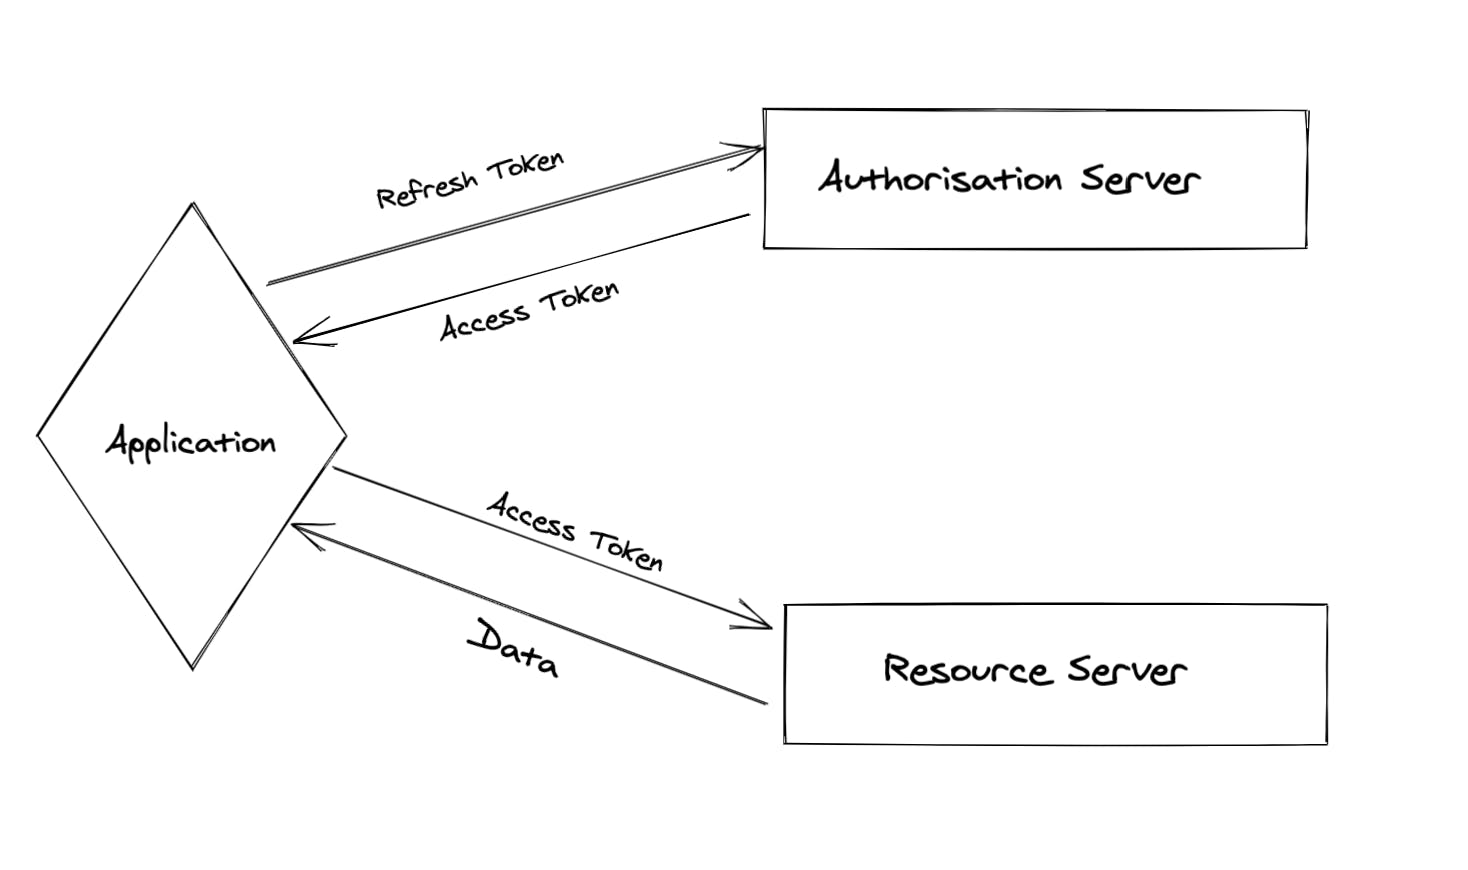
Access Token: This token contains the user's credentials, identity, and privileges used to make an API call on behalf of the user to access resource from the resource server. The lifetime of this token may last from the current application to a couple of days. Once the access token expires, the application forces the user to log in again. The lifetime of this token is kept short due to security purposes.
Refresh Token: Refresh tokens are issued to the client by the authorisation server. Once the access token expires, the refresh token is used to "refresh" the access token. Refresh token has a very long lifespan.
User Registration and Login
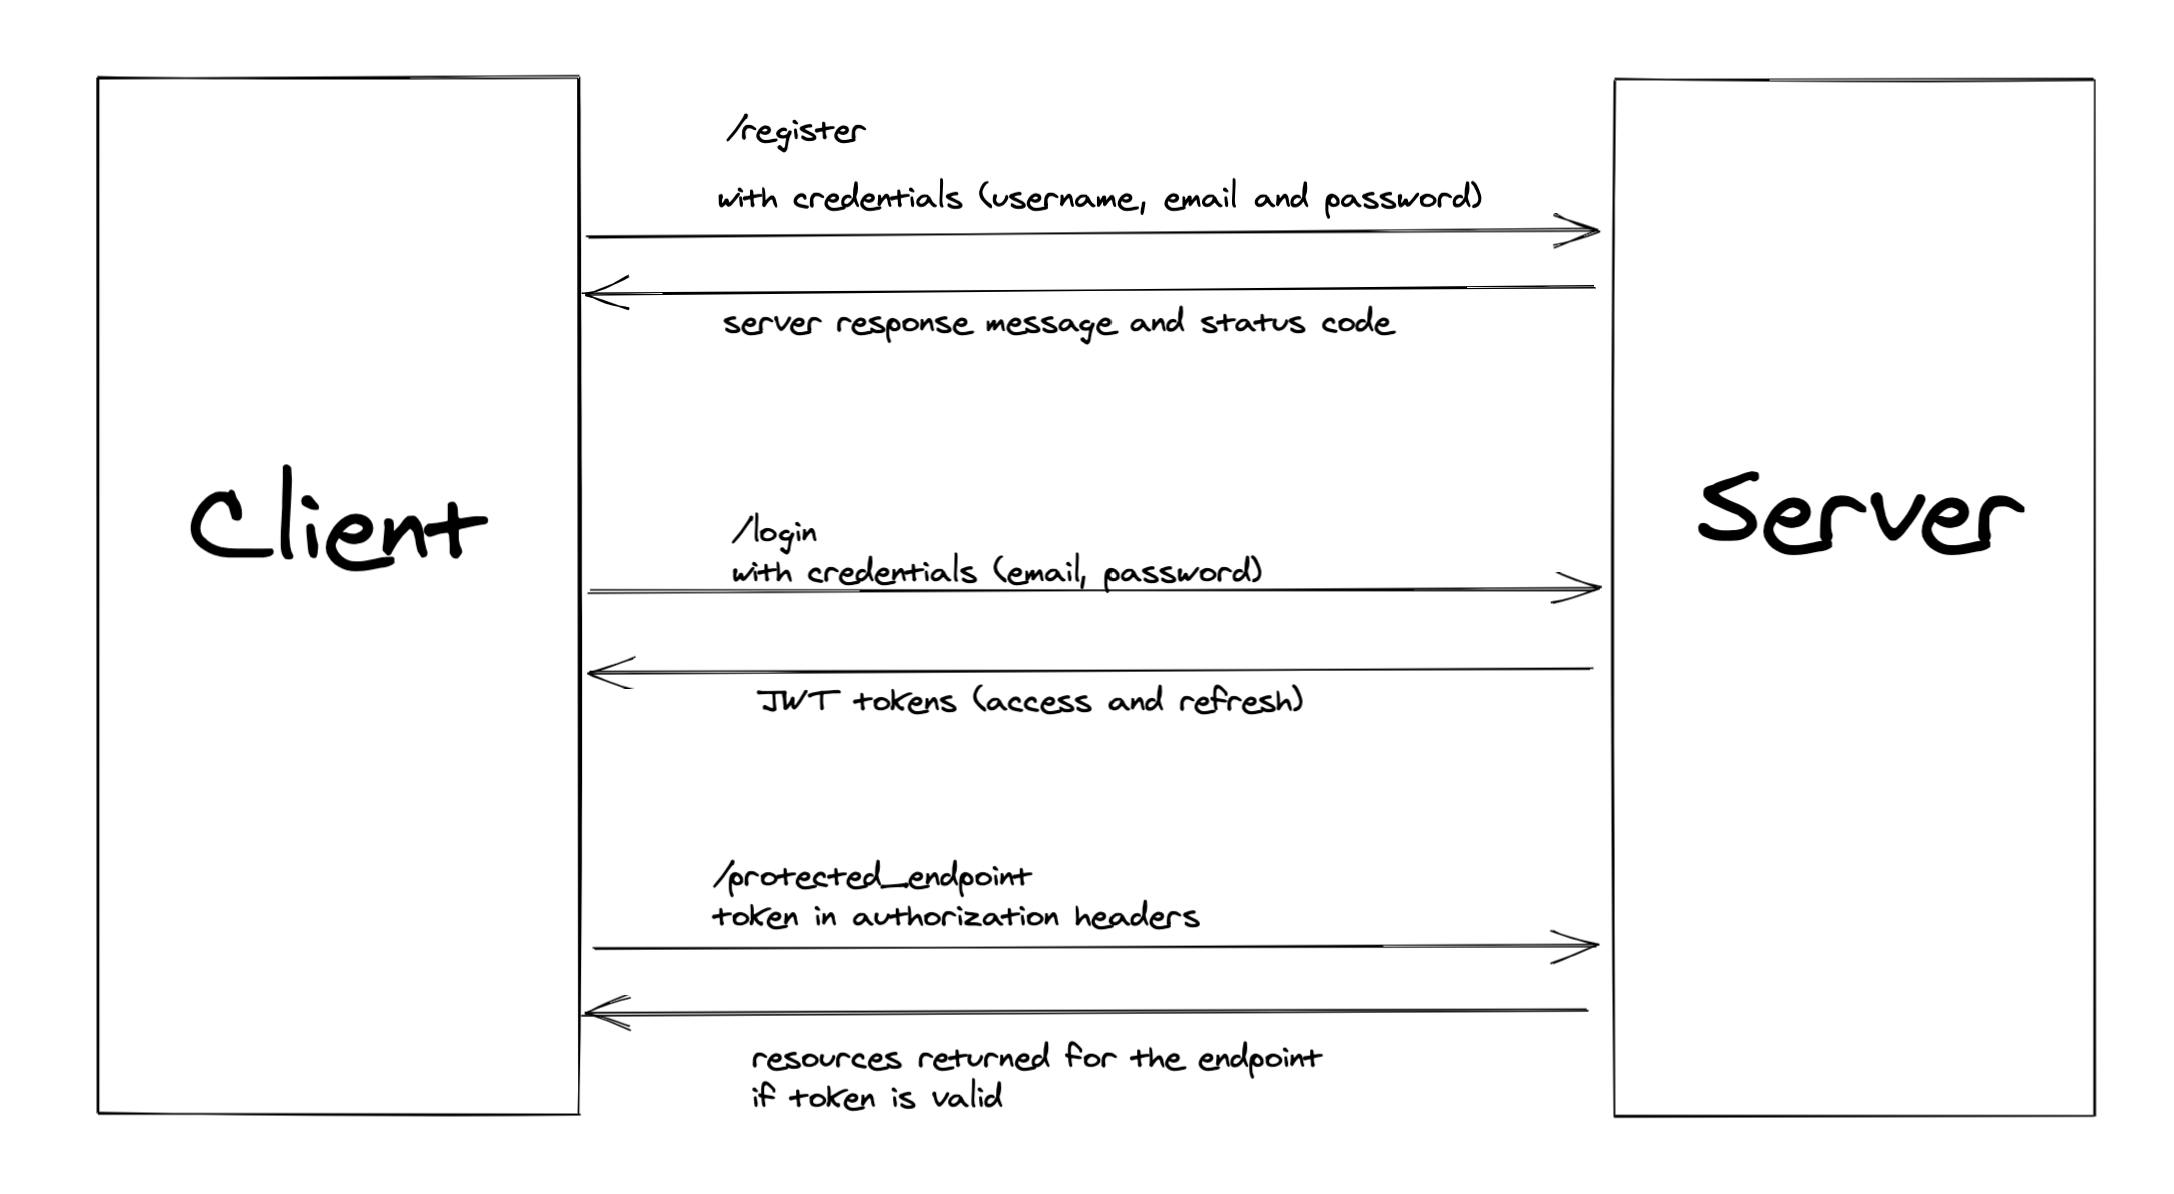
When the user tries to register, its credentials are stored in the database, and the server responds with either a success message and 201 status code or an error message and 400 status code.
While signing in, the user's credentials are sent to the server, which verifies the user's existence in the database. The server responds with an access token and a status code of 200 if the user exists. Sometimes, the auth server also returns some extra information related to the user, e.g., user id.
Cross-Origin Resource Sharing
Cross-Origin Resource Sharing or CORS is a browser mechanism allowing controlled access to resources located outside the given domain.
If someone from a foreign domain makes a request to the server, CORS block the request and returns with an error message. To avoid this, origin is specified in the server which allows that domain to access the server resources
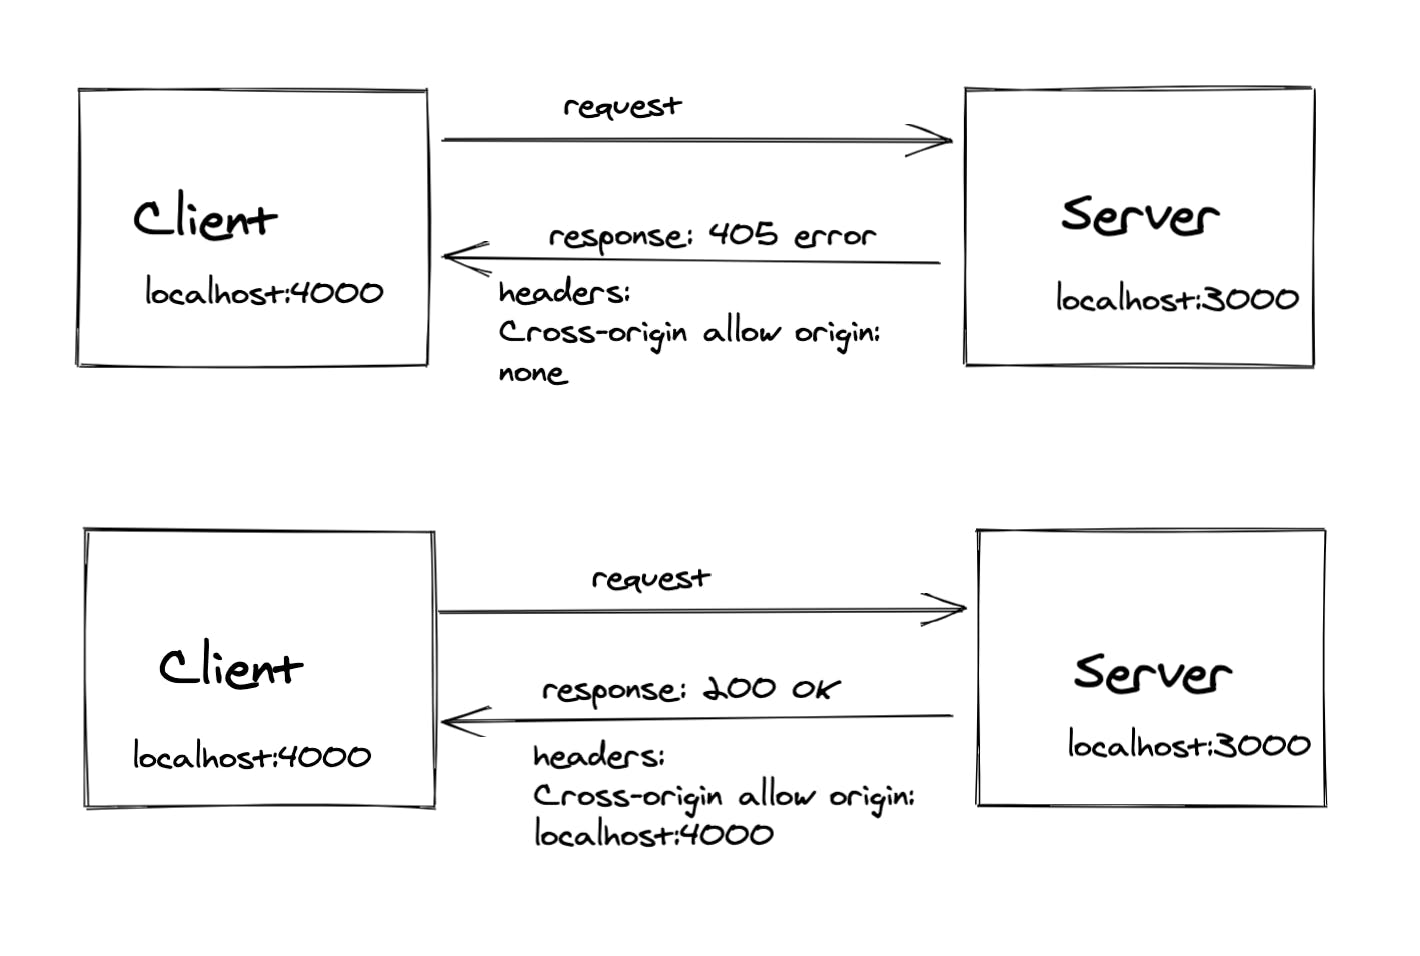
const cors = require('cors');
app.use(cors({origin:'*'}))
The "*" specifies that any domain can access the resource server
OR
const cors = require('cors');
app.use(cors({
     origin:[ "https://localhost:4000",
              "https://www.yourdomain.com/",
              "192.168.32.22"
            ]
))
An array specifying different can also be passed in the origin.
now, lets get started ..
Authentication in NodeJs Server
Get into the directory and initialise npm (Node Package Manager)
$ npm init -y
it initialises package.json file into the directory
Installing Dependencies
We require express, CORS, JWT, mongoose, bcrypt, and dotenv as our dependencies and nodemon as development dependency
$ npm install express mongoose cors jsonwebtokens bcryptjs dotenv
$ npm install nodemon -D
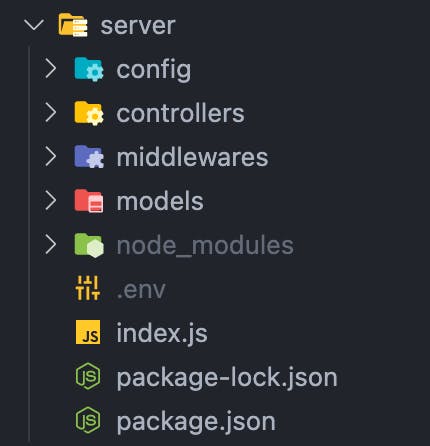
File Structure
How to Connect to your Database?
/config/database.config.js
const mongoose = require("mongoose");

exports.connect = () => {
  mongoose
    .connect(process.env.MONGO_URI || 'mongodb://localhost:27017/test-db')
    .then(() => console.log("Successfully connected to database"))
    .catch((err) => {
      console.log("Database Connection failed, exiting now...", '\n', err);
      process.exit(1);
    });
};
index.js
require("dotenv").config();
require("./config/database").connect();
const http = require("http");
const express = require("express");

const app = express();
const server = http.createServer(app);
const cors = require('cors');

app.use(cors({origin:'*'}))
app.use(require("./controllers/users"));

// setting port
const port = process.env.PORT || 3000;

// server listening
server.listen(port, () => {
  console.log(`Server running on port ${port}`);
});
.env file:
PORT=3001
MONGO_URI= 'Link to your Database '
ACCESS_SECRET= 'Secret for access token '
REFRESH_SECRET= 'Secret for refresh token '
Creating Schema for our User Model
/models/users.js.
const mongoose = require("mongoose");

const userSchema = new mongoose.Schema({
  first_name: { type: String, default: null },
  last_name: { type: String, default: null },
  email: { type: String, unique: true },
  password: { type: String },
});

module.exports = mongoose.model("User", userSchema);
Creating a middleware
Now we will create a middleware that will verify the token that will be received from the API call whenever the user tries to login.
/middlewares/authMiddlewares.js
const jwt = require("jsonwebtoken");
const verifyToken = (req, res, next) => {
     let token = req.headers["authorization"];

     // access token from client
     token = token.split(" ")[1];
     if (!token) {
       return res
             .status(403)
             .send({ message: "Unauthorized, please login first" });
     }

     jwt.verify(token, process.env.TOKEN.ACCESS_SECRET, (err, user) => {
       if (err) {
         return res
              .status(403)
              .json({message: "User not Authenticated, Login Again"});
       }
       req.user = user;
       next();
     });
   };

module.exports = verifyToken;
The middleware function takes three parameters, request, response, and next. req.headers is used to extract sent in an HTTP request. JWT tokens can be verified using jwt.verify method, which takes two parameters, the token itself to be verified and the secret which was used to create that token.
Create users.js file in controllers directory
What if someone got our secret key? He might be able to generate a refresh token from it and can generate access tokens using a refresh token(we already know how this works). To avoid this, create an array, refreshTokens, in the users.js file, which will store refresh tokens in runtime. A new refresh token is generated and pushed into the array each time the client requests for login. This array is searched with the token sent in headers by the client.
let refreshTokens = []
User Registration and Login
registration (/controllers/users.js)
const express = require("express");
const bcrypt = require("bcrypt");
const router = express.Router();
const User = require("../models/users");
var jwt = require("jsonwebtoken");

let refreshTokens = []

router.post("/register", async (req, res) => {
  try {
    const { firstName, lastName, email, password } = req.body;
    if (!(email && password && firstName && lastName)) {
      return res.status(400).send("All inputs are required");
    }

    const oldUser = await User.findOne({ email });
    if (oldUser) {
      return res.status(409).send("User Already Exist. Please Login");
    }

    // encrypting password
    let encryptedUserPassword = await bcrypt.hash(password, 10);

    const user = await User.create({
      first_name: firstName,
      last_name: lastName,
      email: email.toLowerCase().trim(),
      password: encryptedUserPassword,
    });

    return res.status(201).json(user);
  } catch (err) {
    console.log(err);
  }
});

module.exports = router;
We cannot save a user's password directly into the database; anyone who has access to the database can read it and can be able to sign in using those credentials. So to secure the password, bcrypt is used. Bcrypt is a library used to hash passwords; the password is first encrypted and then saved into the database to add extra security to the user's private data.
bcrypt.hash method takes two parameters. The first parameter is the original password, and the second parameter is the number of salt rounds. The greater the number, the more secure the hash is, but it will take longer to generate the hash.
login (/controllers/users.js)
const express = require("express");
const bcrypt = require("bcrypt");
const router = express.Router();
const User = require("../models/users");
var jwt = require("jsonwebtoken");

let refreshTokens = []
router.post("/register", async (req, res) => { ... })

router.post("/login", async (req, res) => {
  try {
    const { email, password } = req.body;

    // validating input
    if (!(email && password)) {
      return res.status(400).send("All input is required");
    }
    const user = await User.findOne({ email });
    console.log(user)
    if (user && (await bcrypt.compare(password, user.password))) {

      let accessToken = jwt.sign({uid: user._id},
             process.env.ACCESS_SECRET, { expiresIn: time });

      let refreshToken = jwt.sign({uid: user._id},
             process.env.REFRESH_SECRET, { expiresIn: time });


      refreshTokens.push(refreshToken)
      return res.status(200).json({ accessToken, refreshToken });
    }
    return res.status(400).send("Invalid Credentials");
  } catch (err) {
    console.log(err);
  }
});

module.exports = router;
bcrypt.compare method compares the hashed password (from the database) and the password that the user sends.
JWT tokens are generated using jwt.sign method, which takes three parameters, data, token secret, and expiry time.
Fetching resources (/controllers/users.js)
const express = require("express");
const bcrypt = require("bcrypt");
const router = express.Router();
const User = require("../models/users");
const verifyToken = require("../middlewares/authMiddlewares.")
var jwt = require("jsonwebtoken");

let refreshTokens = []
router.post("/register", async (req, res) => { ... })
router.post("/login", async (req, res) => { ... })

router.post("/protected-route", verifyToken, (req, res) => {

  User.findById(req.user.uid, (err, user)=> {
    if(err) res.status(404).json({message: "User not found"})
    else {
          // fetch required data
            res.status(200).json({ data });
    }
  })
});

module.exports = router;
Whenever /protected-route/ endpoint is called, it first verifies the token sent in the header using the verifyToken middleware. If the access token present in the request is valid, the middleware returns the user; otherwise, it returns an error message to the client.
Generating access token from refresh token (/controllers/users.js)
const express = require("express");
const bcrypt = require("bcrypt");
const router = express.Router();
const User = require("../models/users");
const verifyToken = require("../middlewares/authMiddlewares.")
var jwt = require("jsonwebtoken");

let refreshTokens = []

router.post("/register", async (req, res) => { ... })

router.post("/login", async (req, res) => { ... })

router.post("/protected-route", verifyToken, (req, res) => { ... })

router.post("/renew-access-token", (req, res) => {
  const refreshAccessToken = req.body.refreshToken;

  if (!refreshAccessToken || !refreshTokens.includes(refreshAccessToken))
    return res.status(403).json({ message: "User not Authenticated" });

  jwt.verify(refreshAccessToken, process.env.REFRESH_SECRET, (err, userObj) => {
    if (err) return res.status(403).json({ message: "User not Authenticated" });
    else {

      const accessToken = jwt.sign({uid: userObj.uid}, process.env.ACCESS_SECRET, {
        expiresIn: time,
      });
      return res.status(200).json({ accessToken });
    }
  });
});

module.exports = router;
This endpoint generates an access token for the user if the existing one expires and sends it back to the client. It checks for the refresh token in the HTTP request's body and checks if that refresh token is created present in the refreshTokens array or not. The user must be anonymous if the token is not present in the array.
Summary
Authentication is the most common way to handle security in an application. This is the way to answer the question "Who you are?" to an application.
Token-based authentication is gaining in popularity because of the rise in single-page applications(SPA) and the application's statelessness (RESTful APIs).
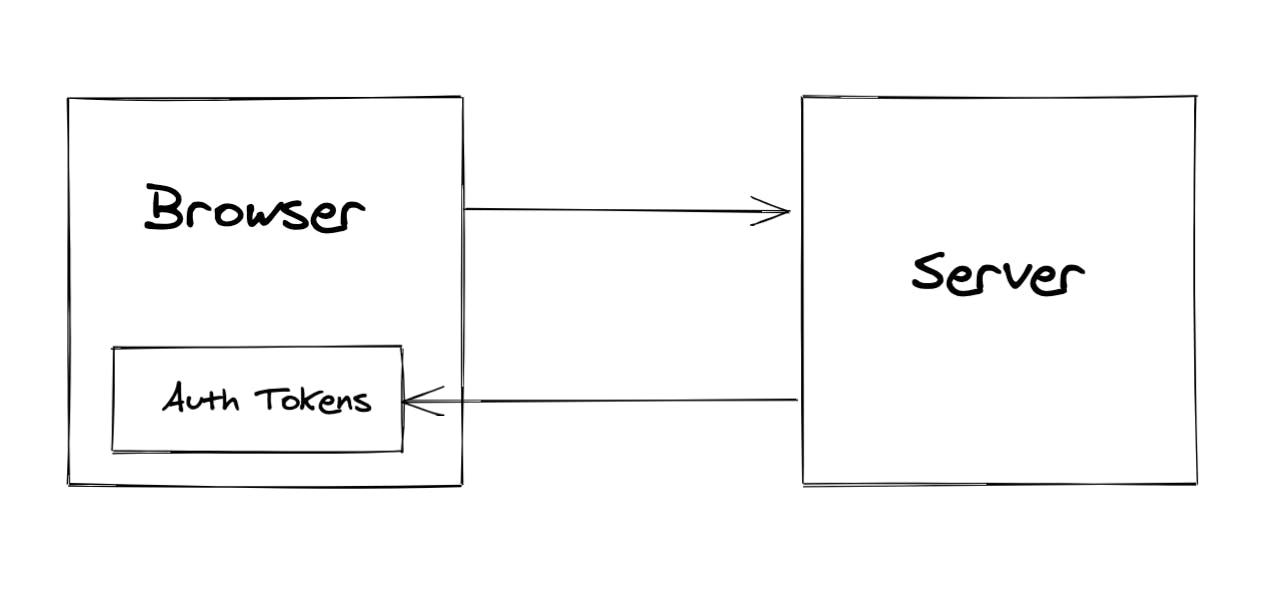
Tokens are generated in the auth server and returned as a response whenever a user tries to log in to the application.
These auth tokens are saved in browser's local storage or session storage.
When the user logs in, an API is called from the client side. API containing HTTP request is sent to the auth server.
The request contains Refresh token (or the user's credentials if the token is invalid) in headers.
The server responds with Access Token, which is used to access the available resources in the resource server.